Hunt Groups
The NBX 100 Communications System provides Hunt Groups to help
you manage your inbound calls. Hunt Groups direct calls to specific
users that you identify as members of the Hunt Groups. You can
configure which users are members of each Hunt Group. You can
also configure Hunt Groups as linear, circular, or as Calling
Groups, determining how incoming calls are managed according to
users' availability.
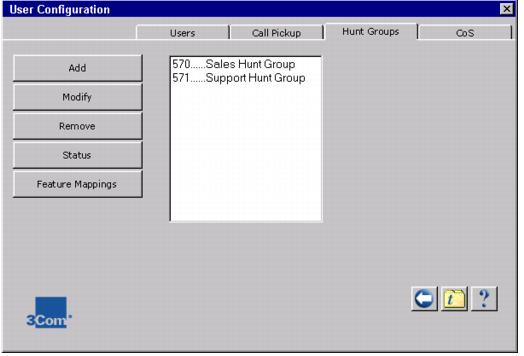
You use the Hunt Groups tab in the Users icon in the NetSet
main menu to configure Hunt Groups. The Hunt Groups window is
shown below.
Figure 26 - Hunt Groups Window
Types of Hunt Groups
The NBX 100 provides three types of Hunt Groups:
- Circular
- Linear
- Calling Group
The Linear and Circular Hunt Groups ring members based on the
Priority of the Hunt Group members. In a Linear Hunt Group, a
call is always forwarded to the highest priority member (with
lowest priority number) if he is available.
The administrator can alter the priority of a Hunt Group member
by removing and adding members. The least recently added member
always has the highest priority. If two members are added at the
same time, the member with the smaller extension number has the
higher priority.
Remove a Hunt Group
You can remove a Hunt Group from the system at any time.
To Remove a Hunt Group
1. Click the User Configuration icon in the
main menu.
2. Click the Hunt Groups tab.
3. Select the Hunt Group from the list.
4. Click the Remove button. A dialog box prompts
you to confirm removal.
5. Click the Yes button to remove the Hunt Group.
Add a Hunt Group
You use the Add button on the Hunt Groups tab to create a new
Hunt Group.
To Add a Hunt Group
1. Click the User Configuration icon.
2. Click the Hunt Groups tab.
3. Click the Add button. The Hunt Group window
appears.
4. Fill out the fields in the window to create the
Hunt Group. Refer to the following table.
5. Select the users you want in this Hunt Group from
the users in the Users list. You can shift-click or control-click
to select more than one.
6. Click the OK button when done.
Table 29 - Hunt Group Window Fields
|
Field |
Purpose |
|
Name |
A descriptive name for the Hunt Group. It will be used as the
caller ID. |
|
Extension |
The extension assigned to the Hunt Group. |
|
Users |
The users to include in the Hunt GroupHunt Group.
You can use Control-click or Shift-click to select members. Click
OK, all the highlighted users become part of the group.
The order of users within the list determines their priority.
The most recently added member has the lowest priority. Can modify
the order by removing and re-adding members. |
|
Type |
The type of Hunt Group.
Hunt Group - Linear:
Hunt Group - Circular:
Calling Group:
Linear and Circular algorithms are based on the priority of
Hunt Group members. |
|
Password |
The password for the Hunt Group. Must be numeric only, and 3-8
digits long. This is the password users will use to log in to
the Hunt Group. |
|
Logout if no answer |
When selected, automatically logs out any user who does not answer
a Hunt Group call within the period specified by Per Device Timeout. |
|
Call Coverage |
The coverage path for a call that has been queued for more
than the period specified by Total Timeout.
Voice Mail: The call is directed to the Hunt Group's voice
mailbox (the Extension that you designate).
Auto Attendant: The call is directed to the Automated Attendant
specified here.
Phone Number: The call is directed to the phone number specified
here. |
|
Total Timeout |
The maximum time for an unanswered call to remain in the queue.
When the maximum is reached, the call is sent on the Call Coverage
path. |
|
Per Device Timeout |
The maximum time for an unanswered call to ring on a specified
phone before being forwarded to the next available phone in the
Hunt Group. |
Modify Hunt Group
You can modify a Hunt Group at any time as necessary by using
the Modify button on the Hunt Group tab.
To Modify a Hunt Group
1. Click the User Configuration icon.
2. Click the Hunt Groups tab.
3. Select the Hunt Group to modify.
4. Click the Modify button. The Modify Hunt
Group window appears.
5. Make changes as necessary.
6. Click the Apply button. The Hunt Group is
modified. The Modify Hunt Group screen remains open.
7. If necessary, make additional changes, then click
Apply to make the new changes take effect.
8. When done, click the Close button.
Hunt Group Status
Use the Status button on the Hunt Groups tab to check the status
of the members of a particular Hunt Group. Each member of the
group is listed, along with each member's current status - logged
in or logged out.
To Check the Status of a Hunt Group
1. Click the User Configuration icon.
2. Click the Hunt Groups tab.
3. Select the Hunt Group from the list.
4. Click the Status button. The Hunt Group Status window
appears. For each member of the group, the following information
is displayed:
- Extension
- First and Last Names
- Priority (Linear and Circular algorithms are based on the
priority of Hunt Group members.)
- Status: logged in or logged out
5. When done, click the OK button.
Hunt Group Feature Mappings
Feature Mappings show the association of the Hunt Group login/logout
Feature Codes and the currently configured Hunt Groups. You use
the Feature Mappings button on the Hunt Groups tab to view and
modify the Feature Code mappings for each Hunt Group.
To Modify Hunt Group Feature Mappings
1. Click the User Configuration icon.
2. Click the Hunt Groups tab.
3. Click the Feature Mappings button. The Hunt Group
Feature Codes screen appears. This screen shows the association
of the Hunt group log in/out feature codes and currently configured
Hunt Groups.
4. Select a Hunt Group from the list.
5. Select a Feature Code from the list. (To remove
a feature code, select "none".)
6. Click the Apply button. The Feature Code is mapped
to the Hunt Group. The Hunt Group extension appears in the Feature
Code list.
7. Repeat as necessary to create more mappings.
8. Click the Close button when done.
|