System Settings
The System Settings tab provides functions that enable you
to view and modify existing system information, including hardware
information and the current system date and time. The System Settings
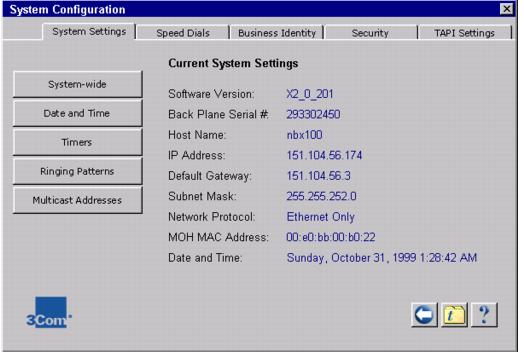
window is shown below.
Figure 21 - System Settings Window
To View Current System Settings
1. Click the System Configuration icon.
2. Click the System Settings tab.
The fields on the tab are as follows:
|
Field |
Purpose |
|
Software Version |
The call control software for the NBX 100. |
|
Back Plane Serial # |
Identifies the code on the circuit board within the NBX 100 chassis
that holds the Netword Call Processor card. |
|
Host Name |
This is an IP setting. It is a name you can give to the NBX 100
so you do not have to specify the IP addess when accessing NetSet
through a browser. A host name works only if you add the name
to your Name resolution system. If you do not use a name resolution
system, you must specify the IP address in your browser. |
|
IP Address |
The IP address of the NBX 100. |
|
Default Gateway |
The IP address of the destination host for any IP packet not
addressed to a host on the local subnet. |
|
Subnet Mask |
An IP setting that identifies the network and host portions of
an IP address on your network. |
|
Network Protocol |
The transport mechanism for voice packets.
Ethernet only: All communications are at the Ethernet
frame layer.
Standard IP: IP communications are used for traffic
between NBX addresses. Note: Every device needs an IP address.
IP-on-the-fly: An implementation of IP communications
in which devices on the same subnet as the call processor communicate
using Ethernet frames; they receive IP configuration settings
only when necessary, to communicate with an IP device on some
other subnet.
Note: IP communications are optional features of the NBX 100
which requi |
|
MOH MAC Address |
The hardware address of the Music-on-Hold device, if any. |
|
Date and Time |
The current system date and time. To modify, click the Date and
Time button. |
Modify System-wide Settings
You use the Modify System-wide Settings button to:
- modify settings for system hardware
- enable Auto Discover
- enable system-wide features such as Silence Suppression,
Music On Hold, Virtual LAN Enabled, Music on Transfer, and Handsfree
on Transfer
- Auto add phones to Call Pickup Group 0
To Modify System Settings
1. Click the System Configuration icon.
2. Click the System Settings tab.
3. Click the System-wide button. The System Settings
appears.
Make the desired changes. Refer to the table below.
|
Field |
Purpose |
|
Host Name |
An IP setting for the NBX 100.
Note: A Host name functions only if you add the name to
your name resolution system. If you do not do this, then you
must enter the IP address in your browser when you want to access
NetSet. |
|
IP Address |
The IP address of the NBX 100. |
|
Default Gateway |
The IP address of the destination host for any IP packet not
addressed to a host on the local subnet. |
|
Subnet Mask |
An IP setting that identifies the network and host portions of
an IP address on your network. |
|
Network Protocol |
The transport mechanism for voice packets.
Ethernet only: All communications are at the Ethernet
frame layer.
Standard IP: IP communications are used for traffic
between NBX addresses. Note: Every device needs an IP address.
IP-on-the-fly: An implementation of IP communications
in which devices on the same subnet as the call processor communicate
using Ethernet frames; they receive IP configuration settings
only when necessary, to communicate with an IP device on some
other subnet.
Note: IP communications are optional features of the NBX
100 which require separate licensing. |
|
Extensions start at |
The starting extension number used by Auto Discover Telephones.
You may select any unused phone number extension from 100 to
499. |
|
External Prefix |
The prefix required for an outside line. |
|
Caller ID wait timer |
Amount of time to wait for receiving Caller ID information. |
|
System-wide Silence Suppression |
Reduces the number of packets transmitted during a conversation. |
|
Auto Discover Telephones
Auto Discover Line Cards
Auto Discover T1 Devices
Auto Discover Adjuncts |
Enables Auto Discover for various system devices.
Note: It is recommended that you leave these settings
disabled so that you can control how and when new devices are
added |
|
Auto add phones to Call Pickup group 0 |
When selected, this adds phones to the default Call Pickup Group
0 when phones are added to the system. |
|
Music On Hold |
Enables Ethernet multicasts for Music On Hold (MOH).
MOH Audio should be enabled only if you have a MOH device connected
to the system. |
|
Virtual LAN Enabled |
Adds a Priority 6 Virtual LAN identifier to each Ethernet frame. |
|
Music on Transfer |
Enables MOH audio for Call Transfer; requires MOH installed and
enabled. |
|
Handsfree on Transfer |
Enable to allow handsfree transfers. |
Click the Apply button. The new settings take
effect.
Modify System Date and Time
You can modify the system date and time as necessary. You use
the Date and Time button on the System Settings tab to set or
correct the date and time information used by the NBX 100 system.
The date and time:
- appear on an idle NBX 100's phone display
- affect Business Hours behavior
- affect Time-Dependent Prompts in the Automated Attendant
To Set the System Date and Time
1. Click the System Configuration icon.
2. Click the System Settings tab.
3. Click the System Date and Time button. The System
Date and Time window appears.
4. Make changes as necessary.
5.Click the OK button. The new date and time take effect.
Modify Timers
You use Modify Timers to set or modify timeout periods
for various NBX 100 features.
To Modify Timers
1. Click the System Configuration icon.
2. Click the System Settings tab.
3. Click the Timers button. The Timers window appears.
4. Make changes as necessary.
5. Click the OK button. The new timer settings take
effect. The Timers window closes.
System Timers
|
Field |
Purpose |
|
Forward Voice Mail On Timeout |
When a phone's FWD VMAIL button is enabled, sets the duration
of ringing before a call is forwarded to voice mail. |
|
Forward Voice Mail Off Timeout |
When a phone's FWD VMAIL button is disabled, sets the duration
of ringing before a call is forwarded to voice mail. |
|
Line Port Hold Timeout |
For a call originating on an outside line, the length of time
that the call remains on hold before it rings at the extension
that parked the call. |
|
Call Park Timeout |
The length of time that a call can be parked before it rings
at the extension that parked the call. |
|
Conference Timeout |
The length of time that a ringing call continues to ring before
it call rings at the extension that transferred the call. |
|
Transfer Timeout |
The length of time that a transferred call attempts the transfer
before it rings at the extension that transferred the call. |
Ringing Patterns
You can configure different ringing patterns to distinguish between
internal and external calls. You use the Ringing Patterns button
on the System Settings tab to establish ringing patterns. Can
choose one, two, or three rings for internal and external calls
to distinguish between internal and external calls.
NOTE: Ringing Patterns should not be confused with Ringer
Tones.
To Set Ringing Patterns
1. Click the System Configuration icon.
2. Click the System Settings tab.
3. Click the Ringing Patterns button. The Ringing Patterns
window appears.
4. Make ringing pattern selections for internal and
external calls.
5.Click the OK button. The new ringing patterns take
effect. The Ringing Patterns window closes.
Multicast Addresses
The NBX 100 utilizes IP Multicast addressing to distribute information
for certain system features, including Mapped Line Appearances,
Music on Hold, Internal and External Page, and Conference Calls.
These features are available on Layer 2 and Layer 3 IP devices.
The IP implementation utilizes IGMP to transmit and distribute
the necessary data and audio.
The NBX 100 IGMP (Internet Gateway Multicasting Protocol) is an
implementation of Administratively Scoped IP Multicast that utilizes
3 scopes of administration: Local Scope, Organizational Local
Scope, and Global Scope. Local Scope is limited by local routers:
239.255.0.0/16; Organizational Local Scope is limited by boundary
routers: 239.192.0.0/14; Global Scope: 224.2.0.0 - 224.2.127.253.
IGMP may not be available in all systems or network topologies.
All of the routers between the various components must support
IGMP and the necessary router protocols to establish a path for
the IP Multicast packets.
Note that each event that occurs in an IGMP setup, such as
taking a phone off hook, causes a packet of 200 to 300 Kb to be
sent.
The default settings for the IP Multicast addresses should
work in most network environments. Users who need to modify the
addresses can do so using the Multicast Addresses button in the
System Settings window to change IGMP addresses when using Standard
IP or IP-on-the-fly network protocols. Certain addresses are reserved.
When you select the Multicast Addresses button in the System
Settings window the Multicast Address List window shown below
appears.
Figure 22- Multicast Address List
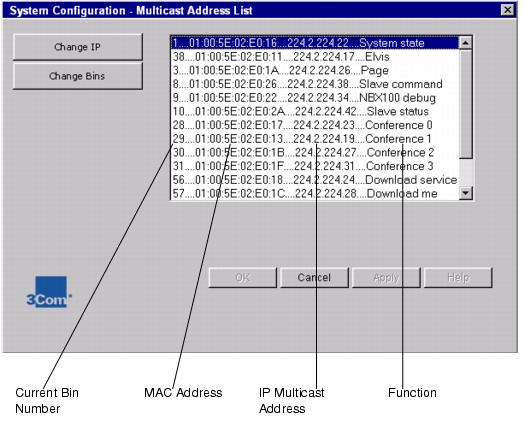
There are two methods for selecting multicast addresses: Change
IP, which lets you select a starting address for all entries,
or Change Bins, which lets you change a single entry by selecting
from a list of available bins.
Changing IP Multicast Addresses
Changing IP multicast addresses is a quick way to confine the
NBX multicast addresses to a smaller range, thereby avoiding conflicts
with other equipment.
1. Click the System Configuration icon.
2. Click the System Settings tab.
3. Click the Addresses button. The IP Addresses window
appears.
4. Make the desired change to the IP Starting address.
The NBX 100 selects a set of addresses starting at or near the
address specified.
5. Click OK.
6. You are prompted to continue with the change. Click
Yes to continue. The system automatically assigns IP multicast
addresses and hash bins based on the starting address.
7. Reboot the system to make the changes take effect.
Changing Bins
Changing IP bins is useful for changing a single address that
may be in conflict with another system device.
1. Click the System Configuration icon.
2. Click the System Settings tab.
3. Select an item from the address list and then click
the Change Bins button. The Change Multicast Bin window appears.
4. Select a bin number from the list of Available Bins.
5. Click OK.
6. You are prompted to continue with the change. Click
Yes to continue.
7. Reboot the system to make the changes take effect.
Upgrading from Earlier Releases to
NBX 100 Release 2.0
After an upgrade from an earlier release of the NBX 100 to Release
2.0, you must enter a new starting IP multicast address enable
the system to regenerate the multicast addresses.
See Multicast Addresses for instructions on changing the IP starting
address. After assigning a new starting IP address, the NBX100
assigns IP and MAC addresses for various multicast channels.
|