Users
The Users tab in the User Configuration menu provides a way
to:
- add and remove users to and from the system
- modify user settings
- view a list of all NBX 100 users in the system
Figure 23 - Users Window
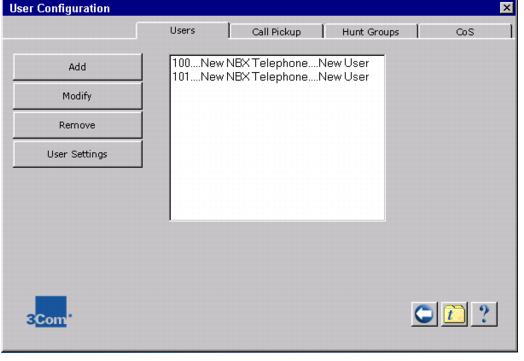
For each user, you see the telephone extension, the device
name, and the user's first and last names.
The user's phone has to be initialized. The user enters voice
mail, enters the telephone extension as a password, and chooses
a new password. Refer to the NBX Business Telephone User's Guide
for more information.
To Remove a User
You can remove a user from the system at any time.
1. Click the User Configuration icon.
2. Click the Users tab.
3. Select the user from the list.
4. Click the Remove button. A dialog box prompts you
to confirm removal.
5. Click the Yes button. The user is removed from the
system and the user's voice mail is deleted.
Add User
You use the Add button in the Users tab to add new users to the
system. You can:
- add and configure a new user
- add and configure the owner of the Attendant Console
To Add a User
1. Click the User Configuration icon.
2. Click the Users tab.
3. Click the Add button. The Add User window appears.
4. Fill out the fields in the Add User window.
5. Click the Apply button. The user is added. The screen
returns to its defaults so you can add another user.
6. Repeat as necessary to add more users.
7. Click the Close button when done.
Table 28 - Add User Fields
|
Field |
Purpose |
|
Extension Number |
Enter the extension for this phone. Specify an unused extension
or the extension of the phone you want to use as it appears in
the Telephone List.
* signifies a telephone with no user
*** signifies a telephone with no user or extension
A telephone available for use is identified by an asterisk (*),
or three asterisks (***) if it has no extension assigned. |
|
First Name |
The user's first name. Appears in lists. |
|
Last Name |
The user's last name. Appears in lists. |
|
Title |
The user's title. |
|
Class Of Service |
The calling permissions for this user. |
|
Location |
The user's location, for purposes of identification. |
|
Department |
The user's department, for purposes of identification. |
|
Associated Telephone |
Click a phone from the list or click none if you are creating
a Phantom Mailbox. |
|
Telephone Group |
The Button Mappings for this user's phone. |
|
Fwd to Auto Attendant |
Redirects unanswered calls to the Auto Attendant instead of voice
mail.
This option should be selected only when setting up an Attendant
Console. |
Attendant Console
You can have incoming calls ring at a designated extension known
as the Attendant Console where a human attendant answers calls
and transfers them to the appropriate destinations. When the human
attendant cannot handle the volume of calls, Attendant Console
calls go to the Automated Attendant.
Figure 24 - Typical Attendant Console Button Mappings
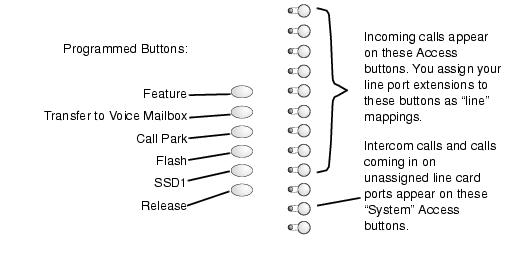
You can expand the number of Access buttons by adding an NBX
DSS/BLF Adjunct.
To Configure a Phone as the Attendant
Console
1. Open NetSet using the administrator username and
password.
If you are adding a new phone to the system, you can use the
Auto Discovery feature to configure the phone.
2. On the main menu, click the User Configuration icon,
and then click the Add button to create a user profile for the
Attendant Console.
3. Specify profile information about the Attendant
Console user.
Specify an unused Extension number. The default Automated
Attendant forwards callers to extension 100 if the caller chooses
the option to speak to an operator. If you use a different extension
for your Attendant Console, be sure to update your Automated
Attendant system. For more information see Automated Attendant
Default Settings on page 176.
First Name and Last Name appear in lists in NetSet. You can
make this profile a generic one, calling it "receptionist"
or "attendant console" if many people share the job.
Title, Location, and Department can help you identify this profile.
Choose a Class of Service and a Telephone Group. The NBX 100
includes an "Attendant Console Group, which includes button
mappings appropriate for the Attendant Console function.
4. Select the Fwd to Auto Attendant check box.
Fwd To Auto Attendant, when selected, diverts calls from the
profile's voice mailbox to the Automated Attendant.
5. Choose a device from the Telephone List.
The list shows all existing phones. An asterisk identifies
phones associated with a "new user" profile, a default
profile assigned to phones during Auto Discovery. The extension
you specified in the Extension Number box replaces the default
extension of the phone you choose.
6. Click OK to close the User Configuration dialog
box.
7. Click the Tab To It button, and then click the Line
Card Ports tab under Device Configuration.
8. Click the first line card port in the list, and
then click the Modify button.
9. Verify that the port's Auto Extension is set to
5.
The Auto Extension setting determines where an incoming call
on this port rings. Setting Auto Extension to 5 directs the call
to the Auto Attendant if no one answers after 4 rings. (The system
uses 5 as a default if you leave the Auto Extension box empty.)
For each line card port that you will map to the Attendant
Console, repeat steps 9 and 10. Make note of the extension number
assigned to each line card port. You need to map these extensions
to Access buttons on the Attendant Console phone. Auto Discovery
uses 5 as the default setting for the Auto Extension.
10. On the Device Configuration dialog box, click the
Telephone Groups tab.
11. On the Current Groups list, click the Attendant
Console group, and then click the Button Mappings button.
12. Map your line card ports to the phone's Access
Buttons.
For each button:
- For Type, choose "line" from the list.
- For Number, specify a line card port extension. Line card
port extensions start at 700. If you configured your line card
ports carefully, the first line card port resides in chassis
1, slot 2, and it is connected to a specific telephone company
phone number. Keeping tack of line card ports and their extensions
allows you to map phone company phone numbers to specific phone
buttons. You can also create Busy Lamp/Speed Dial buttons by
setting the Type to Line and the Number to an internal extension.
When you press that Access button, it functions as a Speed Dial
to the extension. When that extension is in use, your Access
button light illuminates.
- For Priority, enter a priority number. The priority number
establishes a precedence order for extensions when you make outgoing
calls. When you pick up the handset to make a call, the system
activates the line designated as Priority 1. If Priority 1 is
busy, you get the Priority 2 line.
You can map all of your line card extensions to buttons, or
you can map some of your extensions to phones to allow calls to
specific phones without going through the Attendant Console.
Notes on The Attendant Console
- You can manually activate Forward to Automated Attendant
by pressing the FWD MAIL button on the Attendant Console phone.
To Add the Attendant Console User
1. Click the User Configuration icon.
2. Click the Users tab.
3. Click the Add button. The Add User window appears.
4. Choose an Extension. Extension 100 is reserved for
the Attendant Console.
5. Click the Apply button. The user is added and the
window returns to its defaults so you can add another user.
6. Repeat as necessary to add more users.
7. Click the Close button when done adding users.
Modify User
You can modify an existing user at any time. You use the Modify
button on the Users tab to change configuration information for
an existing user.
To Modify a User
1. Click the User Configuration icon.
2. Click the Users tab.
3. Select the user from the list.
4. Click the Modify button. The Modify User window
appears.
5. Make changes as necessary.
6. Click the OK button. The changes take effect.
Personal Settings
You can use Personal Settings to enter the NetSet windows that
are available to users, and to modify settings for a specified
user.
To View a User's Personal Settings
1. Click the User Configuration icon.
2. Click the Users tab.
3. Select a user from the list.
4. Click the User Settings button. The Personal Settings
window appears.
Creating a New User and a New Phone
Setting up a new user with a new telephone, where the extension
number does not have to be any particular number, requires the
following steps:
- Discover the new phone and note the number automatically
assigned to it.
- Create a new User.
- Associate the User with the new phone.
To assign a specific phone extension to the new user requires
one extra step--specify an unused extension
number when you create the User. You cannot assign an extension
to a profile if that extension is already in use.
To Create a New User and a New Phone
1. Open NetSet using the administrator username and
password.
2. On the main menu, click the System Configuration
icon, and then click the System-wide button.
3. Enable the Auto Discover Telephones check box, and
then click the Apply button.
For more information, see Auto Discovery on page 27.
4. Connect a new NBX phone to the network.
For details about connecting a phone, see Connect Phones to
the LAN in the NBX 100 Installation Guide.
Auto Discovery can find a phone if that phone does not already
exist in the configuration database. You can look at the phone's
MAC address, which is printed on the label on the bottom of the
phone, and compare it to the MAC addresses that appear on the
NetSet Device Configuration dialog box to determine whether a
phone already exists in the database.
After the phone completes its initialization process, the
date and time appear in the phone's display panel, along with
the next unused extension number.
5. Exit from the System Configuration dialog box.
6. On the main menu, click the User Configuration icon.
7. On the Users tab, click the Add button.
8. On the Add User dialog box, specify information
about the user.
In the Extensions Number box, specify an unused extension
or the extension of the phone you want to use.
Class of Service specifies the calling permissions for this
user.
First Name and Last Name appear in lists that show User Profiles.
Last Name becomes part of the Internal Directory.
Location and Department are labels that can help you identify
this user.
If you select the Fwd to Auto Attendant check box, the system
forwards calls to the Automated Attendant instead of the profile's
voice mailbox. Select this box only if you are creating a profile
for the Attendant Console.
Click a phone from the Telephone List. An asterisk (*) indicates
a telephone that does not have a User. Three asterisks (***)
indicate a telephone that does not have a User or an extension
number. Click none if you are creating a Phantom Mailbox.
Choose a Telephone Group from the list. The group defines
the Button Mappings for the phone.
Managing Existing Users and Phone
Extensions
Managing extensions can mean any of the following tasks:
- Changing a user's extension number.
- Replacing a user's telephone.
- Exchanging two users' telephones.
The procedure you use to accomplish any of these tasks depends
on the phones and extensions already in use. You might need to
remove the association between the User Profile and the phone
and create a new association, or determine which phone extensions
are available for assignment.
Each of the procedures in this section pose a sample scenario
to demonstrate the steps to accomplish the task.
To Change a User's Extension to an
Unused Extension Number
Scenario: Change the extension number for User A from
212 to 265.
1. Open NetSet using the administrator username and
password.
2. On the main menu, click the User Configuration icon.
3. On the Users tab, view the Users list to determine
available extension numbers.
The list shows Users and their assigned extensions. If you
do not see the number you want, then that number is available
for assignment. If the number you want is already assigned, go
to the next procedure, To Change a User's Extension to an Extension
Number Already in Use.
4. Click the User you want to modify, and then click
the Modify button.
5. On the User Configuration dialog box, type the new
extension, and then click OK.
To Change a User's Extension to an
Extension Number Already in Use
Scenario: Change the extension number for User A to
the extension number now in use by User B, and assign a new extension
to User B.
1. Open NetSet using the administrator username and password.
2. On the main menu, click the User Configuration icon.
3. View the Users list to determine the available extension
numbers.
The list shows profiles and their assigned extensions. Before
you can reassign User B's extension, you must assign a new extension
to User B.
4. In the Users list, click User B, and then click the Modify
button.
5. On the User Configuration dialog box, type an unused extension
in the Extension box, and then click OK.
6. In the Users list, click User A, and then click the Modify
button.
7. On the User Configuration dialog box, type the new extension
for User A, and then click OK.
To Provide a Different Telephone to
an Existing User - New Telephone
Scenario: You must provide a new telephone for User
A with the same extension and button mappings.
1. Open NetSet using the administrator username and
password.
2. On the main menu, click the System Configuration
icon.
3. On the System Configuration dialog box, click the
System-wide button.
4. Enable the Auto Discover Telephones check box, and
then click the Apply button.
5. Connect a new NBX phone to the network.
Auto Discovery finds and configures a phone if that phone
does not already exist in the database. You can look at the phone's
MAC address on the label on the bottom of the phone and compare
it to the MAC addresses on the NetSet Device Configuration dialog
box to determine whether a phone already exists in the database.
After the phone completes its initialization process, the
date and time appear in the phone's display panel, along with
the next unused extension number.
6. After the discovery process is complete, clear the
Auto Discover Telephones the check box, and then click OK.
You can leave Auto Discover enabled, however, disabling it
allows you to control the process of adding devices to your network.
7. On the System Configuration dialog box, click the
Tab To It button.
8. On the Tab To It dialog box, click Users under User
Configuration.
9. Click the User Configuration icon.
10. In the Users list, click the User who is getting the new
phone, and then click the Modify button.
11. In the Extension box, type the extension of the
telephone you just added to the system.
12. In the Telephone List, click the device you just
added, and then click OK.
To Exchange Telephones Between Two
Users
Scenario: User A has a white phone. User B has a black
phone. They agree to trade phones.
1. Open NetSet using the administrator username and
password.
2. On the main menu, click the User Configuration icon.
3. In the Users list, click User A, and then click
the Modify button.
4. On the Modify User dialog box, make note of the
MAC address of the phone assigned to User A, click none in the
Telephones List, and then click the OK button.
5. In the Users list, click User B, and then click
the Modify button.
6. On the Modify User dialog box, make note of the
MAC address of the phone assigned to User B.
7. In the Device list, click the phone that used to
belong to User A, and then click the OK button.
The phone that belonged to User A has no profile and no extension
associated with it so it appears in the list with three asterisks
(***) instead of an extension.
8. In the Users list, click User A, and then click
Modify.
9. On the Modify User dialog box, click User B's old
telephone in the device list, and then click OK.
The phone that belonged to User B has no profile and no extension
associated with it so it appears in the list with three asterisks
(***) instead of an extension.
|